How to Build a Screen Door: 7 Best DIY Steps & Tips
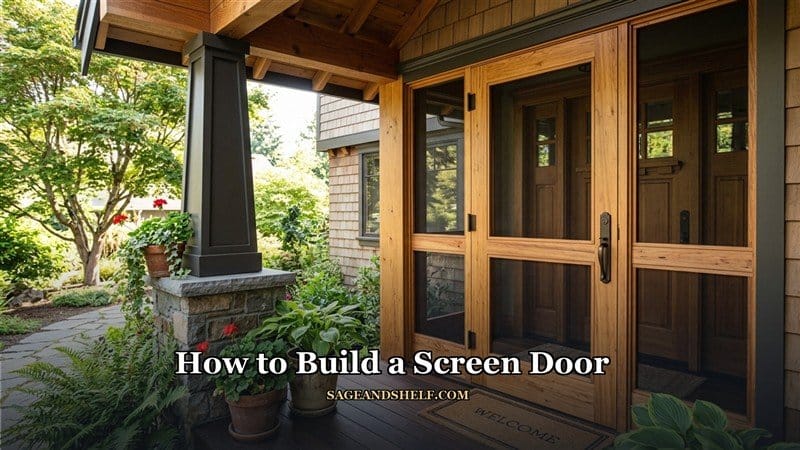
Welcoming fresh spring breezes while keeping unwanted pests outdoors begins with classic carpentry on your porch. Rather than buying flimsy aluminum frames, constructing an enduring wooden frame enhances curb appeal. When building an outdoor door, natural timber adds warmth to your entryway. Specifically, learning how to build a screen door allows homeowners to craft durable timber frames with ease. In addition, discovering how to make a screen door at home gives you complete creative control.
Many homeowners worry about complicated joinery or expensive workshop machinery. Fortunately, straightforward pocket-hole construction requires only basic lumber and standard hand tools. Therefore, building your own custom doorway fixture saves money while delivering timeless craftsman beauty. With careful measuring and basic tools, you can finish this build in a single weekend. Consequently, your home gains excellent airflow and charming style.
What Is a Screen Door and Why Build One Yourself?
A screen door is an exterior secondary doorway frame fitted with breathable wire or fiberglass mesh. Learning how to build a screen door provides natural ventilation while blocking insects. In addition, custom wooden frames easily outlast mass-produced vinyl or metal alternatives. Furthermore, you can customize paint colors, decorative corbels, and hardware finishes to match your trim. Consequently, mastering how to build a screen door combines practical home improvement with rewarding woodworking craftsmanship.
| Door Frame Material. | Recommended Wood Species. | Skill Difficulty. | Estimated Material Cost. |
|---|---|---|---|
| Solid Pine Framing. | Kiln-Dried Select Pine. | Beginner. | $35 to $55. |
| Classic Clear Cedar. | Western Red Cedar. | Beginner to Intermediate. | $65 to $95. |
| Durable White Oak. | Kiln-Dried White Oak. | Intermediate. | $90 to $140. |
| Pressure-Treated Pine. | Exterior Ground Contact. | Beginner. | $30 to $48. |
Step 1: Measure Your Doorway Opening with Exact Precision.
Accurate doorway measurements prevent annoying binding and rubbing once your finished frame hangs. First, measure the opening width across the top, middle, and bottom using a rigid tape measure. Always record the narrowest width measurement to ensure smooth clearance.
Next, measure the height from the threshold sill up to the top head jamb on both sides. In addition, subtract one-quarter inch from the total width and height to allow for seasonal wood expansion. Similar to measuring when planning how to install deck railing, checking square diagonal corners prevents lopsided framing. Therefore, precise initial measurements form the foundation of how to build a screen door successfully.
Step 2: Select Quality Straight Lumber and Essential Tools.
Selecting straight, knot-free lumber ensures your door frame remains flat without unsightly twisting. For example, clear vertical-grain cedar naturally resists outdoor rot and insect damage. In contrast, avoid wet construction studs that warp rapidly during hot summer weather.
| Door Component. | Lumber Dimension. | Quantity Needed. | Assembly Fasteners. |
|---|---|---|---|
| Vertical Side Stiles. | 1-Inch x 4-Inch Cedar. | 2 Pieces (80-Inch). | 1-1/4-Inch Pocket Screws. |
| Top Head Rail. | 1-Inch x 4-Inch Cedar. | 1 Piece (32-Inch). | 1-1/4-Inch Pocket Screws. |
| Center Dividing Rail. | 1-Inch x 4-Inch Cedar. | 1 Piece (32-Inch). | 1-1/4-Inch Pocket Screws. |
| Bottom Kick Rail. | 1-Inch x 6-Inch Cedar. | 1 Piece (32-Inch). | Waterproof Wood Glue. |
Furthermore, gather a miter saw, cordless drill, pocket-hole jig, clamps, and a spline rolling tool. Selecting high-grade wood shelving boards or cedar planks ensures crisp joinery. Ultimately, premium material selection guarantees your DIY screen door stands durable for years.
Step 3: Cut Frame Stiles and Rails to Final Dimensions.
Careful cutting ensures perfectly square joints that fit flush together. First, cut your two vertical side stiles to the exact recorded height using a sharp miter blade. Next, calculate the rail lengths by subtracting the width of both side stiles from the total door width.
Next, cut the top rail, middle divider rail, and wide bottom kick rail cleanly. Clamping a stop block to your miter saw fence ensures all three cross rails match identically. In addition, mark each piece with pencil notations to prevent assembly confusion. Consequently, systematic lumber cutting is an essential milestone when discovering how to build a screen door.
Step 4: Drill Pocket Holes and Assemble the Main Timber Frame.
Strong mechanical joints keep the wooden frame rigid under frequent door slamming. First, drill two pocket holes into both ends of all horizontal rails using a pocket-hole jig. Set your jig and drill collar depth specifically for three-quarter-inch stock.
Next, apply waterproof exterior wood glue generously along all butt joint mating surfaces. Clamp the frame flat against a workbench using corner clamps to ensure flush face alignment. Afterward, drive one-and-a-quarter-inch exterior pocket screws firmly into each joint. Therefore, strong glued pocket joints keep your how to build a screen door project square and sturdy.
Step 5: Router a Clean Spline Channel into the Inner Frame.
Creating a recessed channel allows you to mount insect mesh tightly with rubber spline. First, install a one-eighth-inch straight router bit into your trim router, setting the depth to three-eighths inch. Next, clamp a straight edge guide three-quarters of an inch from the inner frame opening.
Carefully rout continuous perimeter grooves around the top and bottom screen openings. Alternatively, beginners can secure mesh with heavy-duty staples and cover edges with decorative wooden screen molding. In addition, vacuum away wood chips thoroughly to keep grooves clean. Consequently, accurate routing delivers a clean, professional factory appearance.
Step 6: Sand Smooth and Apply Weatherproof Exterior Finishes.
Sanding before installing delicate screen mesh protects the screen cloth from accidental tool tears. Thoroughly sand all faces and edges using an orbital sander with medium and fine sandpaper grits. Softening sharp edges creates an inviting tactile feel and allows exterior coatings to adhere evenly.
For instance, apply two coats of exterior satin porch paint or penetrating teak oil for rustic charm. Wipe away dust completely between coats using a damp microfiber cloth. In addition, seal the bottom end grain heavily to block ground moisture absorption. Consequently, thorough finishing preserves your craftsmanship through wet seasons.
Step 7: Roll Insect Spline and Mount Exterior Hardware.
Stretching the mesh taut prevents sagging while maintaining crystal-clear outdoor views. First, roll charcoal fiberglass or pet-resistant mesh loosely over the framed opening, clamping edges lightly. Next, press vinyl spline into the routed groove using a convex spline roller tool.
Work progressively around the perimeter, pulling mesh gently to eliminate ripples. Trim excess screen mesh neatly along the outer groove edge with a sharp utility knife. Finally, install spring-loaded self-closing hinges, a vintage pull handle, and a magnetic catch to the door jamb. Following these steps proves that simple craftsmanship creates an outstanding doorway upgrade.
How to Make a Screen Door: Pro Tips for Long-Lasting Durability.
Understanding how to make a screen door with structural longevity prevents premature frame sagging. Specifically, installing an adjustable turnbuckle wire from the top hinge corner relieves downward joint tension. In addition, using stainless steel exterior hinges prevents unsightly rust stains on painted wood surfaces.
Furthermore, when figuring out how to make a screen door for high-traffic entryways, choose heavy-duty pet-resistant screen mesh. This tear-resistant vinyl fabric withstands claws, active pets, and daily impacts without stretching. Consequently, applying these expert craftsmanship methods ensures your DIY wooden door stays rigid and functional for decades.
Common Screen Door Building Mistakes to Avoid.
Even skilled woodworkers make simple mistakes when rushing door builds. For instance, forgetting seasonal clearance gaps causes wooden frames to stick tightly during humid summer rainstorms. Always leave one-eighth-inch clearance around all jamb sides.
Another frequent error is using interior fasteners that rust and streak wood surfaces outdoors. In contrast, selecting coated exterior pocket screws and stainless steel hardware prevents dark corrosion stains. By avoiding these common errors, your screen door build remains flawless.
Frequently Asked Questions About Screen Door Construction.
Q1: What is the best wood species when building a screen door?
Western red cedar, white oak, and cypress are the top choices due to their natural weather resistance and lightweight strength.
Q2: How much does it cost to build a DIY screen door?
Building a custom wooden screen door costs between forty and ninety dollars in lumber, mesh, spline, and hardware.
Q3: How do you keep a wooden screen door from sagging over time?
Incorporate a sturdy middle rail, glue all pocket joints securely, and install an adjustable turnbuckle diagonal brace wire.
Q4: Is it difficult for beginners learning how to make a screen door?
Not at all. With standard pocket screws, straight lumber, and a spline roller, beginners can complete the door in a few hours.
Conclusion: Enjoy Fresh Air with Your Custom Screen Door.
In summary, constructing a custom wooden screen door combines simple materials, rewarding carpentry, and delightful comfort. By measuring opening dimensions accurately, building rigid pocket-hole joints, and rolling taut fiberglass mesh, you create an enduring home fixture. Follow these practical steps on how to build a screen door and enjoy refreshing breezes all season long.
Visit sageandshelf for more details.